First Time Camping: Setting Up Your Tent Correctly
Camping can be both a great way to spend a holiday and an excellent hobby to take up. Being in the presence of nature is also a very effective way to ease the stress of everyday urban living, deciding to take a break in the wilderness, is an excellent decision! You'll be in for an adventure
When camping out, usually the first thing that comes to your mind is a tent. It is your home away from home. As with any home, you have to set it up first. What if you have no idea how?
Not to worry. Here are some tips on correctly pitching a tent.
1) Practice at home first
There is a first time for everything. If it's your first time putting up a tent, it's best to get some practice first. Yes, you don't want to be caught unprepared in the campsite, at sunset, and when the rain is barreling down. You have to know what to do already when you're in camp.
Before your first outdoor adventure, pitch your tent on your yard at home first. Read the instructions, do it step by step, and familiarize yourself with each part of the process. Don't just wing it. You may have to practice a couple of times, or even more, times to get the hang of everything. That's okay; the important thing is becoming confident in the art of tent pitching.
The next steps would outline the basics of putting up your tent.
2) Choose an appropriate campsite
The ideal place to pitch a tent would be level ground, free of rocks and jagged terrain. Choose a spot that's as close to smooth and level. If there are rocks, sticks, or small logs around, set them aside. Make sure the ground is as flat as possible before setting things up.
Also, you'll want to select an area that is not too exposed to the wind. Otherwise, your tent becomes a windbreaker, and the gusts blowing against the tent do not help you to get a good night's sleep. A place with lots of trees around would be a great spot.
Most campsites have prepared areas in which you can pitch your tent. You can quickly identify them as patches of land, free of rocks and vegetation. These areas would be the best ones to use. Usually, they would also be spots that have appropriate windbreakers around them, like tall trees.
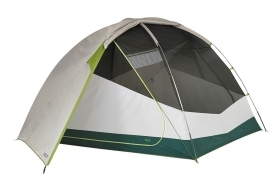
3) Set up the tent
Pitching a tent is not as easy as it sounds. There are many different components to set up beforehand. Here is what you need to do:
- Lay down the footprint. The footprint is the material that covers the ground on which you'll lay down the tent. It protects the underbelly of the tent from scratching the ground. Again, before doing this, make sure the ground is as flat as possible. Clear out any debris first. Make sure your footprint does not stick out from the tent's floor; otherwise, rainwater can collect under the tent.
- Lay down the tent over the footprint. As much as possible, ensure that the tent doors do not face directly against the wind. Also, make sure that the grommets, or the holes for the poles to go through, are aligned carefully.
- Assemble the poles. Each segment of the pole is detachable for easier packing. Once you're ready to use them, attach each end carefully. Doing this in a hurry could break or bend the connecting ends of the poles. As you attach them, also make sure that each end fits nice and tight, so they don't come apart in case of strong winds.
- Attach the poles to the footprint and tent body. Put each end of each pole through the grommets first. Then, attach the tent body to the poles. Most tents have clips, so use these to attach the tent body to the poles. Other tents have sleeves, so you'll have to thread the poles through these sleeves before putting the poles through the grommets.
- Attach the rainfly. Lay it over the tent body and secure it to the poles. Make sure that the door side of the rainfly matches that of the tent.
- Choose a proper orientation. Before securing the tent with stakes and guy lines, it is crucial to orient it the right way. Avoid the broader sides of the tent directly facing the wind. Otherwise, the tent could fly away with the wind like a kite.
4) Secure the tent with stakes and guy lines
Pick one corner of the tent, then insert a stake into the loop. Stretch the corner a bit, then dig the stake into the ground at a 45-degree angle, pointing towards the tent. Next, do the same on the opposite corner. Repeat the same step with the remaining corners to stake down the tent securely.
Next, stake down the rainfly. Close the door of the fly, stretch it out a bit, and stake it down on each corner. Do the same technique as with the tent, pounding the stakes into the ground at 45-degree angles. Then you can adjust the tension of the rainfly to make sure it's taut. Just tighten it enough; don't apply too much tension. A good sign of this is when the seams of the rainfly line up with the poles.
After, you can then secure the tent further with guy lines. Knot the guy lines into the loops on the rainfly, and either anchor them into the ground or a heavy object near the tent, like a log. If winds are mild, staking the guy lines into the ground is enough. If you expect stronger winds, secure the guy lines around logs or heavy objects.
5) Enjoy the evening
There you go! Your tent is ready to occupy. Enjoy your rest amidst the elements, the flora, and fauna. If you did everything right, your tent would be an excellent shield against the wind, rain, and bugs until the next morning.
Have a great and memorable first time camping out!
Next up >> Building a Campfire
Free Camping Recipes

Camping Check Lists