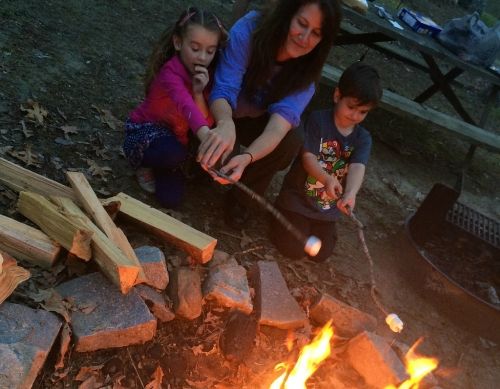
A Beginners Guide to Building a Campfire.
One of the enjoyable things to do when camping out is gathering around a campfire. Especially when the night is cold, nothing beats cozying up to its warmth. Campfires are an outdoor staple, and some would even argue that no camping trip is complete without one.
Never had any experience making a campfire before? Do not worry. This easy-to-follow guide helps new campers get one going quickly.
1) Make or find a fire ring or fire bed
The first thing you need to do is find an area that is appropriate to start a fire. No one ever wants to burn down an entire forest inadvertently.
If you are in a developed campsite, look for a pre-built fire ring. It has a pit to put in firewood and a ring of stones around it to contain the fire. There is usually at least one fire ring lying around.
Otherwise, look for a pre-existing fire bed – charred remains in the ground are the dead giveaway. You have to build your fire ring, though, so find some large stones and put them around the fire bed. Again, the point of this is to control the fire and avoid it spreading to places where it does not belong.
2) Gather your fuel
Ordinary wood, twigs, and sticks do not work. Randomly shoving them into the fire ring and putting a match next to them do not work. Instead, you would need three types of fuel to get your fire started:
- Tinder. No, not the app to get yourself a date. The wilderness is also probably not the best place to get one, kidding aside. Tinder, in this sense, refers to material that can easily catch fire, such as dried leaves, dried grass, wood shavings, and tiny twigs. They combust fast and also burn up fast. These are the guys that can start everything burning.
- Kindling. These comprise small sticks, branches, and other pieces of wood that burn for longer than tinder. Kindling serves as a middleman between the easily burnt tinder and the less combustible larger twigs, ensuring that the fire has a chance to grow bigger and bigger.
- Fuelwood. These are the larger pieces of wood that keep the flames burning well into the night. They take longer to catch fire and burn slowly, which is why the kindling is needed. Without it, the flames from the tinder can not heat the larger pieces of wood enough to start a fire
A crucial thing to keep in mind is that the tinder, kindling, and wood must all be dry to get a good, reliable fire burning. Wood that is wet or moist is not suitable for your campfire.
Also, the fire may eat through your wood faster than you expect. So it's always a good idea to take more than you think you need, to be sure.
3) Build the Fire
Randomly throwing tinder, kindling, and wood into the fire ring is not the way to go. The firewood needs structure too. The easiest one to build is the cone.
First, lay some tinder at the center of the fire ring. Then, take some kindling and stand it up into a cone, so that the tinder goes "inside" the cone. Light the tinder and wait for the fire to grow stronger. Then, add in the larger pieces of wood, forming a similar cone structure.
4) Light the fire
Use waterproof matches or flints to light up the tinder. For flints, the sparks must touch the tinder for flames to form. To make things even simpler, you may pour a little lighter fluid into the kindlings. That is if you brought some lighter fluid along. Otherwise, light up the tinder and wait for the fire to grow.
If the fire is difficult to get going, add more tinder to keep it going. As the flames grow and burn into the kindling, slowly add small pieces of wood. However, take note that it's vital not to smother the flames. Wait for the fire to take hold before adding in the larger pieces of wood.
Once your campfire has grown in size, enjoy the warmth. If you want it to burn for longer, add more wood as needed.
5) Putting the fire out
Once you are done basking in the warmth, it's time to put out the flames. Gently pour water on the fire until it's out. You may have to go around the fire ring for maximum effect. Then, to make sure all the flames are correctly extinguished, stir the ashes and pour more water, this is key, as the fire may restart spontaneously if red-hot embers are left untouched underneath.
As a final check, put the back of your hand towards the ashes to see if it's cold. If it still feels warm, pour more water. Safety first before leaving the campsite.

Oh, and never leave a campfire unattended. Accidents do happen, so it's best to avoid allowing misfortune to wreak havoc on the pristine landscape.
Next up >> Picking a Sleeping Pad
Free Camping Recipes
Camping Check Lists